Thursday, March 29, 2012

Dexster Audio Editor 3.7 - Released

We’re happy to announce the latest version of Dexster Audio Editor 3.7 is available for
download at http://www.dexster.net . In this update, we completely redesigned Dexster Audio Editor’s user interface, making the audio editing environment easier and more enjoyable.

Dexster Audio Editor 3.7 is now optimized for high-resolutions screens (1024 x 768 and more). This will bring a polished, modern feel to the user interface. This new version also added a new set of icons which are bigger, cleaner and smoother. 

Please visit http://www.dexster.net/upgrade.html to learn more about recent updates. 


New features and changes in Dexster version 3.7:
1) A complete makeover of Dexster user interface new
2) Improved: Bigger, cleaner, and smoother icons
3) Improved: Resizable in normal windowstate
4) Improved: Optimized for bigger resolutions
5) Improved: Stability and performance
6) Fixed: Minor bugs found in previous version
7) Updated: Help manual  


Website: http://www.dexster.net


Free Download: http://netdna.dexster.net/audioeditor.exe


Tuesday, January 24, 2012

Videozilla Video Converter 3.4 - new released

We have a brand new version 3.4 of Videozilla Video Converter. This version fixes important bugs that will lead to conversion failure of source video MOV, MP4, 3GP, and M4V with the latest Quicktime player installed. It is recommended to update to this version. Learn more about recent updates at http://www.videozilla.net/upgrade.html

 Version Summary: 
  • Fixed: Unable to convert source video MOV, MP4, M4V, 3GP with the latest QuickTime player installed. 
  • Improved: All other minor bugs found in previous version


Thursday, January 19, 2012

Softdiv PDF to Image Converter - New Released

We are proud to announce the release of Softdiv PDF to Image Converter. By using Softdiv PDF to Image Converter, you can convert PDF to image PNG, JPG, BMP, GIF, TIFF, and more in batch conversion. 

PDF file format is one of the widely used document file format however one will need to install additional software before can view the PDF. By converting PDF to Image, this will allow you to view the image almost anywhere you want eg. mobiles, computers, browsers, portable media devices and etc. Editing work can also be done easily.

Softdiv PDF to Image Converter runs on Windows 2000, 2003, 2008, XP, Vista, and 7. Both 32-bit and 64-bit are supported. Adobe Reader is not needed in order to convert PDF to Image. Please visit http://www.softdivshareware.com/pdf-to-image-converter.html to learn more...


Download: http://netdna.softdivshareware.com/pdftoimage.exe

Website: http://www.softdivshareware.com/pdf-to-image-converter.html

Friday, January 06, 2012

Audiozilla Audio Converter 1.1 Released

We are pleased to announce that Audiozilla Audio Converter 1.1 is now available. Version 1.1 features the improvement of interface design GUI, and fixes all reported bugs found in the previous version. To learn more about recent update, please visit http://www.softdivshareware.com/audiozillaupdates.html

Updates and changes in version 1.1:
1) Fix: Incorrect converted filename
2) Fix: Incorrect converted audio location
3) Fix: Problem to convert audio files that contain special characters in the audio tag
4) Improve: Interface design GUI
5) Improve: Fixes all reported bugs found in previous version
6) Updated: Help Manual


Download: http://netdna.audiozilla.net/audiozilla-audio-converter.exe

Learn more: http://www.softdivshareware.com/audiozillaconverter.html

Wednesday, December 21, 2011

Videozilla Video Converter 3.3 - Just Released!

We are pleased to announce the release of Videozilla 3.3. Videozilla 3.3
included a new feature which allows you to use source's video folder as  
output location. You can now convert and save video files to the source's
video folder.

Facebook video profiles/presets are available in this release. This will
help you to create video that Facebook support without worrying about video format or settings
to be used. 

Version 3.3 also incorporates fixes for reported bugs, improved the support of old mov video
and minor interface design updates for better user experience. Please visit
http://www.videozilla.net/upgrade.html to learn more about recent updates.

New features and changes in version 3.3:
  • Option to use source's video folder as output location new
  • Video bitrate settings for 3GP, MPEG-4, and MOV new
  • Video profiles/presets for Facebook video new
  • Fix: Incorrect converted video location
  • Improve: Minor interface design
  • Improve: Stability to support old MOV video
  • Command-line: New Flag to use source's video folder as output
  • Command-line: New Flag to set video bitrate for 3GP, MPEG-4, and MOV
  •  Help manual and command-line manual updates


Learn more: http://www.videozilla.net


Sunday, November 13, 2011

Protect Your Photo With Watermark

 A photo watermark is a mark that is put on a photo to identify the owner, maker or artist. It is a simple way of indicating that the rights of the photo solely belong to the holder. There are many things that you can use as a watermark. If you like, you can indicate your website, business name, year or even your name. It is very important to have a watermark on your photo as it helps in preventing the unauthorized use of your work or use without attribution.

These are some important things to consider in the successful use of a photo watermark:
  • Use only one color in the watermark. This helps the viewer not to be distracted by the watermark.
  • Make the watermark to be a simple one, especially if you would like to make it appear on the entire image.
  • Let it be on one line at the corner of the photo.

Photopus Pro is a very good photo watermark software that can help to brand your photo. Photopus Pro is a new software that is gaining popularity, helping thousands of people to protect their works. With this software, you can:
  • Automatically resize images
  • Automatically rotate images to landscape or portrait.
  • Automatically flip images horizontally or vertically
  • Automatically crop images

In terms of image converting, Photopus Pro helps you to:
  • Convert your images from one format to another. It supports more than 90 formats of images.
  • Convert your images from RAW digital camera such as Sony, Kodak, Olympus, Nikon and Canon.
  • Create multi-page TIFF or PDF from multi-page images

Photopus Pro can do all those things for you within seconds. It is the solution for all issues relating to photo watermark. Once you have added text to your photos you can set text font, align mode and back color. The textbox position can also be set relative to the corners of the image. The software combines efficiency and simplicity and makes you to enjoy the process of applying or creating a watermark many files in multiple directories. The software supports a mixture of drawings, graphic and text watermark of any complexity. The settings for multi-level transparency enable you to preview and choose how your photos are affected by the watermark. If you are busy, it also enables you to save your projects to be reused later. Therefore, it is a good software that can help in protecting your works.

Learn more about Photopus Pro at http://www.photopus.net

Tuesday, November 08, 2011

How to make audio book

If you want to know the best way on how to make audio book, then you have come to the right place. An audio book is a recorded version of a print book. There are many advantages of having an audio book, one of which is that it can make you to earn extra money from time to time. Through audio books, many people have built successful home businesses generating a promising incoming every month.

If you want to start making your own audio book like thousands of people are already doing, you need to learn how to make audio book. At the same time, it is necessary to use an important tool like Dexster Audio Editor. Let's quickly look at how you can use this wonderful software to make your audio book.

Step 1 - you need to be familiar with the vocabulary and the pacing of the software.

Step 2 - you need to read slowly. Doing that will make your reading to be normal to those listening to you.

Step 3 - do not speak in a monotone. You should keep your listener engaged by changing the pitch. This helps in making the listener to understand what you're saying.

Step 4 - you need to choose the format for your audio book. Most people now use MP3 and CDs because they are the most common.

Dexster Audio Editor is the best software that can help you to make your own audio book. A good thing about it is that it is user-friendly, and you do not need technical knowledge to work with it. Many people always recommend that one should always have an engineer or an expert to make an audio book. But with Dexster Audio Editor, you do not need any of those things. These are some of the important features that you will have with Dexster Audio Editor:

- Support for the editing of multiple files at the same time 

- Use a microphone or other input devices to record an audio file 

- Convert your audio file through different formats. Another good thing is the conversion of audio files in batches.

Dexter Audio Editor is a very good software that helps in making audio book. The software even has Recording Timer that helps in controlling the duration of the recording. This is an important thing that can help you to plan the reading, including some other important features that make any audio book to have more value.

Learn more about Dexster Audio Editor

Thursday, September 29, 2011

How to Record Streaming Video

You can use Recordzilla to record online streaming video.

Here are the step by step guide: 

1. Click here to download and install Recordzilla Screen Recorder

2. Launch your browser and browse to the streaming video that you wish to record

3. Pause the streaming video and let it finish loading

4. Run Recordzilla from your desktop.

5. Click on 1. Region button 

6. Select Custom Region option and click on Select Window

7. Switch back to your browser with the streaming video loaded. Move your mouse over the video until you get a red rectangle border frame surrounding the Video as follow:  


 8. Press F4 to confirm the selection

9. On Recordzilla, click on 2. Video button and select the output video format that you wish to use 

10. Click on 3. Audio button. Under record audio from, Look for "Stereo Mix, Stereo, Loopback, Wave, Wave Out Mix, Record Master or All".

(Please note that the source name might be varies according to what sound cards you have)

Windows Vista and Windows 7 users please refer to this guide


11. Click on 4. Output button and set Save File Manually

12. Click on Record Now to start the video recording.

13. To stop a recording:

a) Using Hotkeys - Enter Shift + F5
b) Left-click on the System Tray red icon
c) Right-click on the System Tray red icon and select Stop Recording...
d) Right-click on the System Tray red icon, show Recordzilla and click on Stop recording button


Like what You see? 
 

Recordzilla Screen Recorder 1.1 - New

We are pleased to announce the release of Recordzilla Screen Recorder 1.1. The latest release feature greatly improved performance over past version bringing a better region selection tool. This fixes the problem to click-through the selected region area and screen white-out issue when Windows Aero theme is enabled in Windows Vista or 7.

Another important fix in this release is the run time error '13'. This error happened on second execution onwards especially on non-english based Windows. We are glad to announce this has been fixed.

A new option to create html page is now available when you output the recording as SWF video. This will save your time from creating the html page manually. Please visit  http://www.softdivshareware.com/recordzillaupdates.html for more info about recent updates.

New features and changes in version 1.1:
  • Option to create html page when output recording as swf video new 
  • Fixed: Run time error '13'
  • Fixed: Unable to click inside the selected region area when Windows Aero theme is enabled
  • Fixed: Screen white-out issue when Windows Aero theme is enabled
  • Fixed: Incorrect Auto-Save output location
  • Fixed: All other minor bugs found in previous version
  • Updated: Help manual


Learn more about Recordzilla at http://www.softdivshareware.com/recordzilla-screen-recorder.html

Thursday, September 22, 2011

File compression and format conversion

Whether you are on your audio, video or photo projects, you'll find yourself dealing with different type of file formats. Now with the help of Audiozilla, Videozilla and Photopus Pro file format converter software, you can easily convert or compress nearly every file type you'll run into.


Audiozilla Audio Converter
For your audio projects, Audio CD backup, or convert audio for your iPad, iPod, PSP, mobile purpose, Audiozilla is the software you must have. Audio conversion can be done easily with only a click.


Videozilla Video Converter
With Videozilla, you can convert video from one format to another. Whether you are converting the video for uploading to youtube, iPad, PSP, iPhone, mobile or your video projects, Videozilla provides the easiest and fastest way to get the video conversion done.


Photopus Pro Photo Converter
Photopus Pro isn't just photo converter software. There are more you can do with Photopus Pro while converting the photo to another format like applying watermark, resize, rename, touch-up, and etc.

Wednesday, August 10, 2011

Audiozilla Audio Converter - New Released !

We are pleased to announce the release of AUDIOzilla Audio Converter.

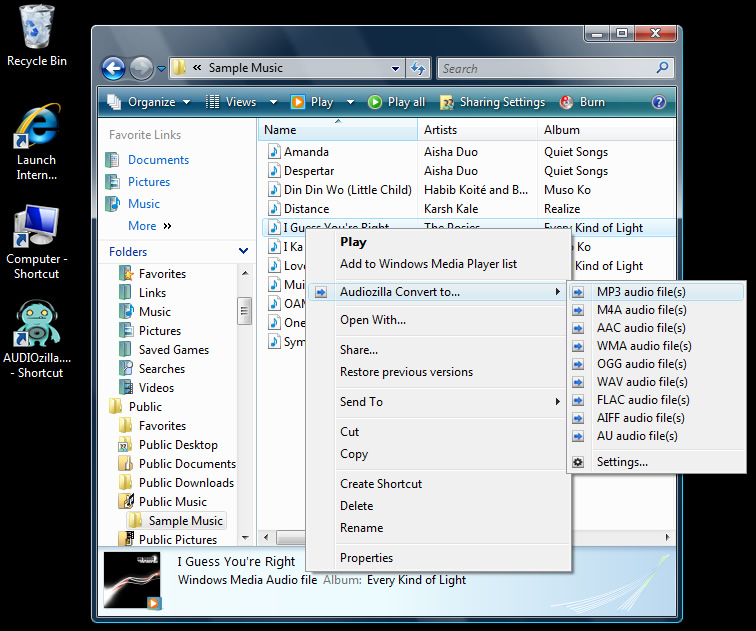
Audiozilla is complete audio converter software that works via a right-click. Just right-click any audio files on Windows Explorer, Audiozilla can immediately convert audio MP3, WAV, AC3, OGG, WMA, FLAC, AAC, M4A, APE, VOX, VOC, AIFF and more to other formats.

Options can be set for start and end points of an audio; output audio format quality like bitrates, channels, sample size; keep / remove audio tag information.

Audiozilla also perform audio extraction from video files MP4, WMV, ASF, M4V. Direct conversion from Audio CD ( CDA ) with the option to save album information is also supported.


  Audiozilla screenshot

Key Features:

1) Audio Converter
Convert audio between almost any formats: MP3, M4A, AAC, OGG, WMA, FLAC, AU, 

WAV, AIFF, MP2, AC3, AU, APE, MPC, MOD, VOC, CAF, RAW, PCM, GSM, VOX, WV

2) Extract Audio from Video
Select and convert audio from video files MP4, M4V, WMV, ASF


3) Extract Audio from Audio CD
Select and convert audio from audio cd tracks. Automatically looks up track info and 

names the converted tracks.

4) iPhone / iPad / iPod / Mobile / PSP Audio Converter
Convert audio files for your iPhone, iPad, iPod, Mobile, PSP


5. Right-click Convert
Easiest way to convert audio file(s). Just right-click and convert.


Learn more about Audiozilla at http://www.softdivshareware.com/audiozillaconverter.html


Wednesday, July 06, 2011

How to Remove Vocals From a Song


Have you ever wanted to remove a song vocals from the music, either to replace them or create karaoke tracks?

The process of eliminating the human voice from music tracks is a very complicated process. However, by using Dexster Audio Editor, you can do it in just a few simple steps:


Step 1:  
Download Dexster Audio Editor at http://www.dexster.net and install it

Step 2:
Run Dexster. Click on Load button on the toolbar and select the music file that you want to remove the vocals

Step 3: 
Click on Tools menu and select Reduce Vocals

Step 4. 
Now click on Play button on toolbar and you will notice that the vocals were eliminated from the music

Step 5: 
Click on File menu, Save As a new audio file


Watch the video tutorial at: http://www.dexster.net/dexster_reducevocals.html

Learn more about Dexster at http://www.dexster.net

Thursday, May 05, 2011

How to Resize Hundreds of Photos

Photopus is such a tool, capable of resizing hundreds of your photos in just one go. Whether you would like to resize the photos to fit in your monitor, reduce photo file size so that it will take less of your hard disk space, or share it with your friends when large photo size is a problem.

With Photopus, you will no longer need to resize the photo one by one. We designed Photopus to resize hundreds of your photos with ready preset for most common output sizes in just 3 simple steps.

Step 1: Add Photos


a. Click on Add button at the bottom and select Add Photo (s)

b. Select the photos that you would like to resize

c. To remove photo from resizing, select the photo and click on Remove button at bottom and select Remove.


Step 2: Add Filters


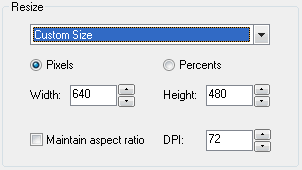
a. By default the output photos width and height will be the same as the source photo width and height. To specify a custom width x height, select Custom Size under the Resize combo box.
  • Pixels - Customize the output width and height in pixel values
  • Percents - Customize the output width and height in percentage values
  • Width - Output photo new width in pixel or percentage
  • Height - Output photo new height in pixel or percentage
  • Maintain aspect ratio - Checked this option to have the output photo maintaining the aspect ratio
  • DPI - Change the new Dot Per Inch value

b. You may also use the ready preset instead of specify a custom width and height value manually. From the Resize combo box, select one of the following:
  •  Photo 4 x 6 inch (10 x 15 cm)
  • Photo 5 x 7 inch (13 x 18 cm)
  • Photo 6 x 8 inch (15 x 20 cm)
  • Photo 8 x 10 inch (20 x 25 cm)
  • 100 x 75 (avatar)
  • 150 x 112 (thumbnail)
  • 320 x 240 (for websites and email)
  • 640 x 480 (for message boards)
  • 800 x 600 (15-inch monitor)
  • 1024 x 768 (17-inch monitor)
  • 1280 x 1024 (19-inch monitor)
  • 1600 x 1200 (21-inch monitor)

Step 3. Output 


a. By default the output photos will be saved at C:\Photopus . To change the output location, click on Browse button and select a new location. To use the source photo's path as output, check the Use source photo's folder for output.

b. By default the output photo format will be JPEG. To change the output photo format, select a new output format from the combo box.

c. You may customized to have the output location folder opened after the processing; Prompt asking for overwriting existing photo file; Set the output photo meta information same as the source photo; Play notify sound upon completion.

Click on Process to start the processing.


Learn more about Photopus: http://www.photopus.net

Thursday, April 14, 2011

Dexster Audio Editor 3.6 - New

We are pleased to announce the release of Dexster 3.6. Dexster 3.6 can be downloaded at http://www.dexster.net . The brand new version is now support audio formats M4A, MP4, AAC, and FLAC for editing.

AAC audio format is one of the widely used audio format and also the standard audio format for iPhone, iPod, iPad and etc. You may now use Dexster to edit your favourite songs and save them as AAC for your iPhone, iPod, iPad and etc.

In addition, Dexster 3.6 also improves the audio cd reading performance. A new and better method has been used. You may read more about the recent updates at http://www.dexster.net/upgrade.html

New features and changes in Dexster version 3.6:
  • Support audio m4a, mp4, aac, flac as read / write new
  • Batch conversion support m4a, mp4, aac, flac audio as read / write new
  •  Paste from file support audio cd, m4a, mp4, aac, flac audio new
  • Mix Paste from File support audio cd, m4a, mp4, aac, flac audio new
  • Fixed: VST plugins loading error issue
  • Improved: New method for reading audio cd format
  • Improved: Audio tag editor to read and write m4a audio data
  • Updated: Internal links to new website http://www.dexster.net 
  • Updated: Help manual  
  
Learn more about Dexster: http://www.dexster.net


Tuesday, March 08, 2011

Audio Recording Software with MP3 Support!

Dexster Audio Editor is an easy to use audio recording software to record what you hear from your computer, voice recording, or even transfer your tapes, records into digital audio format like MP3, WAV, WMA, OGG and more. You may use Dexster to:

Record what you hear from your computer 
Record your voice from the microphone  
Convert Tapes, Records into digital audio format   
    Record what you hear from your computer
    You may want to record sound from the internet streaming, CDs, sound from player like RealPlayer, Windows Media Player, QuickTime and etc for listening later, please follow the following steps:

    Step 1: Run Dexster. check the right panel of Dexster. There is an option for Recording. Under the source, Look for "Stereo Mix, Stereo, Loopback, Wave, Wave Out Mix, Record Master or All"

    Step 2: Adjust the recording volume and click on the record button on the toolbar to start the recording

    Step 3: To Stop the recording, click on stop button on the toolbar. Click on File menu, Save As to save the recording as digital audio MP3, WAV, WMA, or OGG

    Record your voice from the microphone
    You may want to record sound from the microphone, please follow the following steps:

    Step 1: Run Dexster. check the right panel of Dexster. There is an option for Recording. Under the source, Look for "Mic"

    Step 2: Adjust the recording volume and click on the record button on the toolbar to start the recording

    Step 3: To Stop the recording, click on stop button on the toolbar. Click on File menu, Save As to save the recording as digital audio MP3, WAV, WMA, or OGG

    Convert Tapes, Records into digital audio format
    You may want to record sound from the cassette tape, LPs or other input devices and convert them into digital audio format like MP3, WAV, WMA, OGG, or Audio CD, please follow the following steps:

    Step 1: Run Dexster. check the right panel of Dexster. There is an option for Recording. Under the source, Look for "Line-In"

    Step 2: Adjust the recording volume and click on the record button on the toolbar to start the recording

    Step 3: To Stop the recording, click on stop button on the toolbar. Click on File menu, Save As to save the recording as digital audio MP3, WAV, WMA, or OGG. To burn the digital audio as Audio CD, click on Tools menu and select Audio CD Burning.

    Learn more about Dexster at http://www.dexster.net

    Monday, February 21, 2011

    Introducing Photopus Pro

    Photopus Pro is an easy to use batch image processing software to simplify the process to convert, add watermarks (text and image), resize, transform, touch-up, rename, and apply effects to your digital images

    Instead of spending hours to edit your digital images individually, Photopus Pro lets you perform batch image processing in a single operation. With Photopus Pro, you can batch resize images automatically with ready preset for most common output sizes; Rotate images; Flip; Rename images; Crop images; Add watermark text or image to your images; Convert image to other image formats (including multi-page PDF, TIFF); Adjust DPI; Apply special effects like black and white, sepia, blur, emboss, red eye correction, twirl, grayscale, add border and more; Touch-up images by adjusting brightness, contrast, sharpen, smooth, color balance and etc.

    Photopus Pro comes with clean and well designed interface. It only involved 3 steps to process your images: Add Photos, Add Filters, Output. Through every step of the process you can preview the changes made before saving the images. Settings can be saved and load for next image processing project.

    Photopus Pro supports over 90 images formats including BMP, JPG, GIF, TIFF, TGA, PNG, ICO, PDF, PDF/A, PSD, WMF, EMF, JBIG, JBIG2, WBMP, PICT, PCT, JNG, JPEG 2000, PIC, ICB, VDA, VST, PDD, WAP, WBM, EXR, PNM, PBM, PGM, PPM, XPM, 3FR, ARW, BAY, GMQ, CAP, CR2, CRW, CS1, DC2, DCR, DCS, DNG, DFR, ERF, FFF, HDR, IIQ, K25, KC2, KDC, MDC, MEF, MOS, MRW, NEF, NRW, ORF, PEF, PTX, PXN, QTK, RAF, RAW, RDC, RW2, SR2, SRF, STI, CUR, CUT, DDS, DIB, FAX, HDR, IFF, BIE, JBG, JB2, JIF, KOA, LBM, MNG, PCD, PCX, PFM, PGM, RAS, SGI, RLE, XBM, IA, EXIF, JTIF and etc. RAW camera files and multi-page image format is fully supported.

    Learn more about Photopus Pro: http://www.softdivshareware.com/photopuspro.html


    Monday, November 22, 2010

    Videozilla Video Converter 3.2 - New

    Have you ever wondered how to upload your favourite video in Youtube but unsure of what type of setting and video format to use? Videozilla 3.2 is the answer! Videozilla version 3.2 can convert your video into Youtube compatible formats in no time. This new release includes special profiles/presets to convert your video for sharing on Youtube.

    The new version of Videozilla improves WMV encoding speed. You can expecting the speed to be at least 2x faster than the previous version. WMV 9 encoding is now supported. 

    Putting Flash SWF/FLV video on your website is now much easier with Videozilla 3.2. This new release also includes an option to generate SWF/HTML loader for loading the converted Flash SWF/FLV video on your website. 

    To learn more about latest updates, please visit: http://www.videozilla.net/upgrade.html

    What's new in version 3.2?  
    1. Video profiles/presets for Youtube video (NEW)
    2. Option to generate html and swf loader for Flash SWF / Flash FLV (NEW)
    3. Support WMV 9 video format encoding (NEW)
    4. Improvement 2x speed for WMV encoding
    5. Improvement over MP4, M4V video support
    6. Improvement over multiple instances of conversion
    7. Fixes Interface design bugs in Windows 7 (64-bit)
    8. Help manual and command-line manual updates

    Learn more about Videozilla: http://www.videozilla.net


    Sunday, November 21, 2010

    How to convert video for Youtube

    Want to upload video to Youtube but you find that Youtube doesn't support the video file or the quality doesn't up to something you are expecting? 

    Videozilla Video Converter can convert your video into Youtube compatible video format with the best quality and settings. Just run Videozilla, select a Youtube ready-made presets and convert the video. 

    Here are the step by step guide: 

    Step 1: Download Videozilla Video Converter
    Click here to download and install Videozilla Video Converter  


    Step 2: Run Videozilla and Select MPEG-4 Settings 
    Run Videozilla and click on Options button. From the Options screen, click on MPEG-4 settings button on the left. 


    Step 3: Select a Youtube ready-made preset  
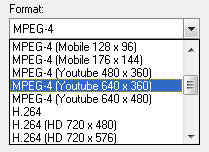
    Click on the Format combo-box. There are 6 Youtube ready-made presets available for selection:


      • MPEG-4 (Youtube 480 x 360) - 4:3  
      • MPEG-4 (Youtube 640 x 360) - 16:9 
      • MPEG-4 (Youtube 640 x 480) - 4:3 
      • H.264 (Youtube 480 x 360) - 4:3 
      • H.264 (Youtube 640 x 480) - 4:3  
      • H.264 (Youtube 1280 x 720) - 16:9 

      For standard resolution video, we would recomend to select MPEG-4 (Youtube 640 x 360) and for High-Definition video our recomendation would be H.264 (Youtube 1280 x 720)

      Click on OK button to save the settings.  


      Step 4: Convert the video 


      Goto your Windows Explorer, select the video that you wish to convert and right-click your mouse. From the context menu, select Convert to... and click on MPEG-4 video file(s).

      After the conversion, Videozilla will automatically popup the converted folder.


      Step 5: Upload video to Youtube
      To upload video to Youtube, just follow the instructions on Youtube site. Just select the converted MPEG-4 video for upload 


      Like what You see? 
      Visit http://www.videozilla.net to find out more.   


      Saturday, October 30, 2010

      Convert video to iPhone with Videozilla IPhone Video Converter

      Convert video avi, mov, mp4, wmv and other popular video formats into IPhone mobile device easily with Videozilla IPhone Video Converter. Just run Videozilla, select a IPhone ready-made presets and convert the video. 


      Here are the step by step guide: 


      Step 1:

      Download Videozilla IPhone Video Converter

       
      Click here to download and install Videozilla IPhone Video Converter


      Step 2:

      Run Videozilla and Select MPEG-4 Settings


      Run Videozilla and click on Options button. From the Options screen, click on MPEG-4 settings button on the left.


      Step 3:

      Select a IPhone ready-made preset


      Click on the Format combo-box and select H.264 (iPhone/iTouch 640 x 420)

      Click on OK button to save the settings.


      Step 4: Convert the video 
        
      Goto your Windows Explorer, select the video that you wish to convert and right-click your mouse. From the context menu, select Convert to... and click on MPEG-4 video file(s).


      After the conversion, Videozilla will automatically popup the converted folder.


      Step 5: Transfer Video to IPhone
      Attach IPhone to your computer and synch it with iTunes . That's all you will need to know in order to convert video to your IPhone with Videozilla IPhone Video Converter.


      Like what You see? 
      Visit http://www.videozilla.net to find out more.

      Thursday, October 14, 2010

      Introducing Recordzilla Screen Recorder

      Capture video, audio and pictures of anything you see on your computer screen and save it as video AVI, WMV, Flash SWF, or Flash FLV with Recordzilla, the brand new software from Softdiv.

      You can use Recordzilla to record the entire desktop, active windows, any portions of the screen, mouse cursor's movement, menus, games, and even video with sound. You can also use Recordzilla to record from microphone to add narration to your recordings, or record what you hear from the computer speakers. Advanced features includes time stamp your videos, schedule a recording, hotkeys, adjust video resolution, size, and frame rate. Recordzilla is useful for creating training videos, presentations, demos, recording streaming video eg. Youtube, recording webcams from AIM, Skype, ICQ, MSN Messenger, Yahoo Messenger or capture movies from TV card, DVD, VCD

      What can you do with Recordzilla Screen Recorder?

      1. Desktop Screen Recording

      2. Record Webcams

      3. Create Training Videos, Presentations, Demos

      4. Online Video Recording eg. Youtube

      5. Games Recording

      6. Record Movies from TV card, DVD, VCD

      7. Schedule Recording

      8. HotKeys Shortcuts

      9. Date & Time Stamping Recording

      10. Audio Recording

      Learn more about Recordzilla : http://www.softdivshareware.com/recordzilla-screen-recorder.html
      Related Posts Plugin for WordPress, Blogger...