
Record what you hear from your computer
Record your voice from the microphone
Convert Tapes, Records into digital audio format
|
| Record what you hear from your computer You may want to record sound from the internet streaming, CDs, sound from player like RealPlayer, Windows Media Player, QuickTime and etc for listening later, please follow the following steps: Step 1: Run Dexster. check the right panel of Dexster. There is an option for Recording. Under the source, Look for "Stereo Mix, Stereo, Loopback, Wave, Wave Out Mix, Record Master or All" Step 2: Adjust the recording volume and click on the record button on the toolbar to start the recording Step 3: To Stop the recording, click on stop button on the toolbar. Click on File menu, Save As to save the recording as digital audio MP3, WAV, WMA, or OGG Record your voice from the microphone You may want to record sound from the microphone, please follow the following steps: Step 1: Run Dexster. check the right panel of Dexster. There is an option for Recording. Under the source, Look for "Mic" Step 2: Adjust the recording volume and click on the record button on the toolbar to start the recording Step 3: To Stop the recording, click on stop button on the toolbar. Click on File menu, Save As to save the recording as digital audio MP3, WAV, WMA, or OGG Convert Tapes, Records into digital audio format You may want to record sound from the cassette tape, LPs or other input devices and convert them into digital audio format like MP3, WAV, WMA, OGG, or Audio CD, please follow the following steps: Step 1: Run Dexster. check the right panel of Dexster. There is an option for Recording. Under the source, Look for "Line-In" Step 2: Adjust the recording volume and click on the record button on the toolbar to start the recording Step 3: To Stop the recording, click on stop button on the toolbar. Click on File menu, Save As to save the recording as digital audio MP3, WAV, WMA, or OGG. To burn the digital audio as Audio CD, click on Tools menu and select Audio CD Burning. |
Learn more about Dexster at http://www.dexster.net |

Software news, tips, updates, and tutorials of the Softdiv Software products.
Tuesday, March 08, 2011
Audio Recording Software with MP3 Support!

Monday, February 21, 2011
Introducing Photopus Pro
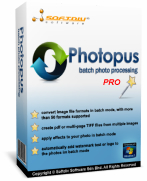 Photopus Pro is an easy to use batch image processing software to simplify the process to convert, add watermarks (text and image), resize, transform, touch-up, rename, and apply effects to your digital images.
Instead of spending hours to edit your digital images individually, Photopus Pro lets you perform batch image processing in a single operation. With Photopus Pro, you can batch resize images automatically with ready preset for most common output sizes; Rotate images; Flip; Rename images; Crop images; Add watermark text or image to your images; Convert image to other image formats (including multi-page PDF, TIFF); Adjust DPI; Apply special effects like black and white, sepia, blur, emboss, red eye correction, twirl, grayscale, add border and more; Touch-up images by adjusting brightness, contrast, sharpen, smooth, color balance and etc.
Photopus Pro comes with clean and well designed interface. It only involved 3 steps to process your images: Add Photos, Add Filters, Output. Through every step of the process you can preview the changes made before saving the images. Settings can be saved and load for next image processing project.
Photopus Pro supports over 90 images formats including BMP, JPG, GIF, TIFF, TGA, PNG, ICO, PDF, PDF/A, PSD, WMF, EMF, JBIG, JBIG2, WBMP, PICT, PCT, JNG, JPEG 2000, PIC, ICB, VDA, VST, PDD, WAP, WBM, EXR, PNM, PBM, PGM, PPM, XPM, 3FR, ARW, BAY, GMQ, CAP, CR2, CRW, CS1, DC2, DCR, DCS, DNG, DFR, ERF, FFF, HDR, IIQ, K25, KC2, KDC, MDC, MEF, MOS, MRW, NEF, NRW, ORF, PEF, PTX, PXN, QTK, RAF, RAW, RDC, RW2, SR2, SRF, STI, CUR, CUT, DDS, DIB, FAX, HDR, IFF, BIE, JBG, JB2, JIF, KOA, LBM, MNG, PCD, PCX, PFM, PGM, RAS, SGI, RLE, XBM, IA, EXIF, JTIF and etc. RAW camera files and multi-page image format is fully supported.
Learn more about Photopus Pro: http://www.softdivshareware.com/photopuspro.html
Monday, November 22, 2010
Videozilla Video Converter 3.2 - New

Have you ever wondered how to upload your favourite video in Youtube but unsure of what type of setting and video format to use? Videozilla 3.2 is the answer! Videozilla version 3.2 can convert your video into Youtube compatible formats in no time. This new release includes special profiles/presets to convert your video for sharing on Youtube.
The new version of Videozilla improves WMV encoding speed. You can expecting the speed to be at least 2x faster than the previous version. WMV 9 encoding is now supported.
Putting Flash SWF/FLV video on your website is now much easier with Videozilla 3.2. This new release also includes an option to generate SWF/HTML loader for loading the converted Flash SWF/FLV video on your website.
To learn more about latest updates, please visit: http://www.videozilla.net/upgrade.html
What's new in version 3.2?
1. Video profiles/presets for Youtube video (NEW)
|
2. Option to generate html and swf loader for Flash SWF / Flash FLV (NEW)
|
3. Support WMV 9 video format encoding (NEW)
|
4. Improvement 2x speed for WMV encoding
|
5. Improvement over MP4, M4V video support
|
6. Improvement over multiple instances of conversion
|
7. Fixes Interface design bugs in Windows 7 (64-bit)
|
8. Help manual and command-line manual updates
|
Sunday, November 21, 2010
How to convert video for Youtube
Want to upload video to Youtube but you find that Youtube doesn't support the video file or the quality doesn't up to something you are expecting?
Videozilla Video Converter can convert your video into Youtube compatible video format with the best quality and settings. Just run Videozilla, select a Youtube ready-made presets and convert the video.
Here are the step by step guide:
Step 1: Download Videozilla Video Converter
Click here to download and install Videozilla Video Converter
Step 2: Run Videozilla and Select MPEG-4 Settings

Run Videozilla and click on Options button. From the Options screen, click on MPEG-4 settings button on the left.
Step 3: Select a Youtube ready-made preset
Click on the Format combo-box. There are 6 Youtube ready-made presets available for selection:
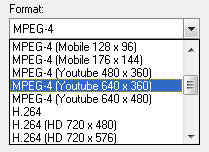
- MPEG-4 (Youtube 480 x 360) - 4:3
- MPEG-4 (Youtube 640 x 360) - 16:9
- MPEG-4 (Youtube 640 x 480) - 4:3
- H.264 (Youtube 480 x 360) - 4:3
- H.264 (Youtube 640 x 480) - 4:3
- H.264 (Youtube 1280 x 720) - 16:9
For standard resolution video, we would recomend to select MPEG-4 (Youtube 640 x 360) and for High-Definition video our recomendation would be H.264 (Youtube 1280 x 720)
Click on OK button to save the settings.
Step 4: Convert the video

Goto your Windows Explorer, select the video that you wish to convert and right-click your mouse. From the context menu, select Convert to... and click on MPEG-4 video file(s).
After the conversion, Videozilla will automatically popup the converted folder.
Step 5: Upload video to Youtube
To upload video to Youtube, just follow the instructions on Youtube site. Just select the converted MPEG-4 video for upload
Like what You see?
Visit http://www.videozilla.net to find out more.
Saturday, October 30, 2010
Convert video to iPhone with Videozilla IPhone Video Converter

Convert video avi, mov, mp4, wmv and other popular video formats into IPhone mobile device easily with Videozilla IPhone Video Converter. Just run Videozilla, select a IPhone ready-made presets and convert the video.
Here are the step by step guide:
Step 1:
Download Videozilla IPhone Video Converter
Step 2:
Run Videozilla and Select MPEG-4 Settings

Run Videozilla and click on Options button. From the Options screen, click on MPEG-4 settings button on the left.
Step 3:
Select a IPhone ready-made preset

Click on the Format combo-box and select H.264 (iPhone/iTouch 640 x 420)
Click on OK button to save the settings.
Step 4: Convert the video

Goto your Windows Explorer, select the video that you wish to convert and right-click your mouse. From the context menu, select Convert to... and click on MPEG-4 video file(s).
After the conversion, Videozilla will automatically popup the converted folder.
After the conversion, Videozilla will automatically popup the converted folder.
Step 5: Transfer Video to IPhone
Attach IPhone to your computer and synch it with iTunes . That's all you will need to know in order to convert video to your IPhone with Videozilla IPhone Video Converter.
Like what You see?
Visit http://www.videozilla.net to find out more.
Thursday, October 14, 2010
Introducing Recordzilla Screen Recorder
 Capture video, audio and pictures of anything you see on your computer screen and save it as video AVI, WMV, Flash SWF, or Flash FLV with Recordzilla, the brand new software from Softdiv.
 You can use Recordzilla to record the entire desktop, active windows, any portions of the screen, mouse cursor's movement, menus, games, and even video with sound. You can also use Recordzilla to record from microphone to add narration to your recordings, or record what you hear from the computer speakers. Advanced features includes time stamp your videos, schedule a recording, hotkeys, adjust video resolution, size, and frame rate. Recordzilla is useful for creating training videos, presentations, demos, recording streaming video eg. Youtube, recording webcams from AIM, Skype, ICQ, MSN Messenger, Yahoo Messenger or capture movies from TV card, DVD, VCD
What can you do with Recordzilla Screen Recorder?
1. Desktop Screen Recording2. Record Webcams
3. Create Training Videos, Presentations, Demos
4. Online Video Recording eg. Youtube
5. Games Recording
6. Record Movies from TV card, DVD, VCD
7. Schedule Recording
8. HotKeys Shortcuts
9. Date & Time Stamping Recording
10. Audio Recording
Learn more about Recordzilla : http://www.softdivshareware.com/recordzilla-screen-recorder.html
Subscribe to:
Posts (Atom)
