Monday, November 22, 2010

Videozilla Video Converter 3.2 - New

Have you ever wondered how to upload your favourite video in Youtube but unsure of what type of setting and video format to use? Videozilla 3.2 is the answer! Videozilla version 3.2 can convert your video into Youtube compatible formats in no time. This new release includes special profiles/presets to convert your video for sharing on Youtube.

The new version of Videozilla improves WMV encoding speed. You can expecting the speed to be at least 2x faster than the previous version. WMV 9 encoding is now supported. 

Putting Flash SWF/FLV video on your website is now much easier with Videozilla 3.2. This new release also includes an option to generate SWF/HTML loader for loading the converted Flash SWF/FLV video on your website. 

To learn more about latest updates, please visit: http://www.videozilla.net/upgrade.html

What's new in version 3.2?  
1. Video profiles/presets for Youtube video (NEW)
2. Option to generate html and swf loader for Flash SWF / Flash FLV (NEW)
3. Support WMV 9 video format encoding (NEW)
4. Improvement 2x speed for WMV encoding
5. Improvement over MP4, M4V video support
6. Improvement over multiple instances of conversion
7. Fixes Interface design bugs in Windows 7 (64-bit)
8. Help manual and command-line manual updates

Learn more about Videozilla: http://www.videozilla.net


Sunday, November 21, 2010

How to convert video for Youtube

Want to upload video to Youtube but you find that Youtube doesn't support the video file or the quality doesn't up to something you are expecting? 

Videozilla Video Converter can convert your video into Youtube compatible video format with the best quality and settings. Just run Videozilla, select a Youtube ready-made presets and convert the video. 

Here are the step by step guide: 

Step 1: Download Videozilla Video Converter
Click here to download and install Videozilla Video Converter  


Step 2: Run Videozilla and Select MPEG-4 Settings 
Run Videozilla and click on Options button. From the Options screen, click on MPEG-4 settings button on the left. 


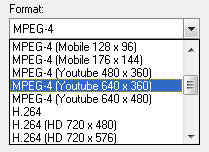
Step 3: Select a Youtube ready-made preset  
Click on the Format combo-box. There are 6 Youtube ready-made presets available for selection:


    • MPEG-4 (Youtube 480 x 360) - 4:3  
    • MPEG-4 (Youtube 640 x 360) - 16:9 
    • MPEG-4 (Youtube 640 x 480) - 4:3 
    • H.264 (Youtube 480 x 360) - 4:3 
    • H.264 (Youtube 640 x 480) - 4:3  
    • H.264 (Youtube 1280 x 720) - 16:9 

    For standard resolution video, we would recomend to select MPEG-4 (Youtube 640 x 360) and for High-Definition video our recomendation would be H.264 (Youtube 1280 x 720)

    Click on OK button to save the settings.  


    Step 4: Convert the video 


    Goto your Windows Explorer, select the video that you wish to convert and right-click your mouse. From the context menu, select Convert to... and click on MPEG-4 video file(s).

    After the conversion, Videozilla will automatically popup the converted folder.


    Step 5: Upload video to Youtube
    To upload video to Youtube, just follow the instructions on Youtube site. Just select the converted MPEG-4 video for upload 


    Like what You see? 
    Visit http://www.videozilla.net to find out more.   


    Related Posts Plugin for WordPress, Blogger...